In this article, we will learn about adding Cache in Spring Boot application. I will be taking real world example where we will have a database to store the data and then a redis cache to store the frequently requested data. Without wasting time, let’s dive into it.
Why Caching?
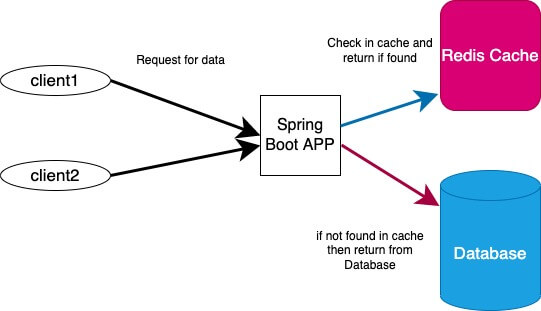
Caching is a mechanism of storing information/data that is hit most frequently in a storage just before our main database. It lies between application and database. Doing this will reduce the hits on the database as the information will be pulled from the cache storage.
Caching improves application performance by reducing load on the database which in turn is served by cache storage. This will also improve user experience and loading time as the data is retrieve without hitting the main database. By the way cache is mostly RAM so the resources is served faster.
Types of Caching
Cache lies between application and persistent database. Mostly data that do not change frequently and is frequently requested is saved in cache. There are different types of caching.
In-memory caching
Redis and Memcached are common examples of in-memory database. This type of caching is most frequently used to enhance the performance of application. The main reason behind caching being fast is as the data is stored in RAM which is faster than the typical disk used to stored data in database.
The question arise what strategy to be used to store the data in cache. There are different cache invalidation algorithms such as LRU (Least Recently Used), LFU (Least Frequently used) and many others. Based on need and requirement these algorithm is used. The most common one is LRU.
You might also want to read:


Database Caching
There is one more layer of caching inside database by default. These configuration can be tweaked to boost the performance of application further. First level cache of Hibernate is quite popular.
Content Delivery Network (CDN)
Content Delivery Network is quite popular nowadays. It enhances user experience by delivering content such as images, videos, javascript files etc from the closest server to the user location. There is a local copy of the data on to every distributed CDN which is know as Point of Presence.
Web Server Caching
As the application is deployed to some kind of server, there are intermediary storage in the server which can be used. For example: reverse proxies which routes the url to the backend. They can store most frequently static content and dynamic data too as on demand. This cache stores the page that is most frequently visited by user. This will reduce load on the server and enhance page delivery speed.
Enable Caching in Spring Boot
Spring Boot provides integration with different cache providers like Redis, Couchbase, EhCache etc. If Spring Boot finds the providers it automatically configures with default options.
Spring boot provides out of box cache abstraction layer which can be simply implemented without needing to consider different aspect. There are certain spring cache terminology need to understand before jumping on to building cache applicaiton.
@EnableCaching
@EnableCaching annotation tells Spring Boot to inspect any annotation for caching and if such annotation is found then intercept the method call and handle it differently. This annotation is used on top of Application class which is annotated with @SpringBootApplication. IF no instance of CacheManager is defined, Spring enables concurrent hashmap as default CacheManager provider. We can override CacheManager to register external cache provider as per need.
Spring Boot automatically configures a suitable CacheManager to server cache. It searches for a specific provider and, if none is found, it creates an in-memory cache with concurrent HashMap.
@Cacheable
It is a method level annotation that tells Spring that the method response is cacheable. Spring manages request and response as cacheable as defined by the annotation attributes.
The cacheable annotation has basically two arguments: cache name and the key which is used to store response value. Key is a unique identifier for each entry in the cache. If no values are passed in the annotation then spring uses class fields to generate a key. This is not a good approach as we want the key to be under control and hence defining key is a good idea.
@Cacheable(“nameOfCache”, “keyName”): First argument is cache name and the second argument is the name of key.If there is single argument in the method where the annotation is at the top then we do not need the key argument as the only argument is treated as key. However, for many arguments in a method, we should have key.
@Cacheable( value="user", key="#id")
public User getById(String id){
//code
}
In the given example, the returned value from getById() method is cached in user with id as unique key. So, when any request or the method is executed then Spring checks if the id exist in cache at first and if it is then the value is returned as response. If the id does not exists in key then the instructions inside method is executed and the response is added in the cache.
Conditional Caching
Sometime we might need a separate condition to cache the data instead of simple method call. Cache provides annotation to add conditional parameter which takes expression which is evaluated in the form of boolean before data can be saved to cache. Let’s take an example:
@Cacheable(cacheNames=“user”, condition="#name.length() < 32")
public User findByName(String name){
//code
}
Here in this example, users with name length less than 32 characters is saved in the cache only. The name with more than 31 characters is directly returned from main database.
@CacheEvict
@CahceEvict annotation acts as eviction of data. As the method is called, it triggers removal of data from cache. For example the delete request will delete data from database and we also remove it from cache. Unused or Stale data is removed from cache by using CacheEvict annotation.
@CachEvict( value="user", key="#id")
public User deleteUser(String id){
//code
}
With CacheEvict annotation as the method deleteUser is called, the annotation removes data from the cache with the id value as key. CacheEvict also provides eviction of entire cache values. This comes in handy when all the values inside a cache is unused and need to cleared out.
@CachEvict( value="user", allEntries=true)
All the data inside cache is deleted if passed allEntries=true.
@CachePut
It is also a method level annotation. There is one difference between Cacheable annotation and CachePut annotation: cacheable annotation skips method execution which means it pulls whatever value is in cache whereas cacheput annotation runs the method and the returned response is used to update the value in cache.
Whenever update in the database is required, CachePut is the appropriate solution as it does not interfere with method execution and updates cache value.
@CachPut( value="user", key="#id")
public User updateUser(String id, User user){
//code
}
@Caching
@Caching annotation enables multiple caching annotation on a single methods. Multiple annotation is triggered based on conditions. It allows multiple annotation nested on the same method. CachePut and CacheEvict can be used at the the same time.
@Caching(evict = {@CacheEvict("name"), @CacheEvict(value="user", key="#user.id") })
public String getName(User name)
{
//code
}
Setup Redis Locally
Nowadays, running image seems more convenient. To run image you must have Docker installed on your machine. Once Docker is installed and running just run the command:
docker run —d name my-redis-container -d redis
So, what this command does is, it will pull the latest image of redis and run it which means it will create a container or running instance of image. By default it will run on 6379 port.
However for this post, we will be setting up password too in redis using the following command:
docker run --name redis-test -p 6379:6379 -d --restart=always redis:latest redis-server --appendonly yes --requirepass "mypassword"
Setup of Spring Boot Cache with Redis
Let’s use Spring Starter tool to generate a project with one click. I will be using IntelliJ for development. You can use any development tools you like for example Spring Tool Suite or Eclipse.
This is how your pom.xml file should look like:
<?xml version="1.0" encoding="UTF-8"?>
<project xmlns="http://maven.apache.org/POM/4.0.0" xmlns:xsi="http://www.w3.org/2001/XMLSchema-instance"
		 xsi:schemaLocation="http://maven.apache.org/POM/4.0.0 https://maven.apache.org/xsd/maven-4.0.0.xsd">
	<modelVersion>4.0.0</modelVersion>
	<parent>
		<groupId>org.springframework.boot</groupId>
		<artifactId>spring-boot-starter-parent</artifactId>
		<version>2.5.7</version>
		<relativePath/> <!-- lookup parent from repository -->
	</parent>
	<groupId>com.fullstack.coder</groupId>
	<artifactId>redis-cache</artifactId>
	<version>0.0.1-SNAPSHOT</version>
	<name>redis-cache</name>
	<description>Demo project for Spring Boot Redis Cache</description>
	<properties>
		<project.build.sourceEncoding>UTF-8</project.build.sourceEncoding>
		<project.reporting.outputEncoding>UTF-8</project.reporting.outputEncoding>
		<java.version>11</java.version>
	</properties>
	<dependencies>
		<dependency>
			<groupId>org.springframework.boot</groupId>
			<artifactId>spring-boot-starter-cache</artifactId>
		</dependency>
		<dependency>
			<groupId>org.springframework.boot</groupId>
			<artifactId>spring-boot-starter-data-redis</artifactId>
		</dependency>
		<dependency>
			<groupId>org.springframework.boot</groupId>
			<artifactId>spring-boot-starter-web</artifactId>
		</dependency>

		<dependency>
			<groupId>mysql</groupId>
			<artifactId>mysql-connector-java</artifactId>
			<scope>runtime</scope>
		</dependency>

		<dependency>
			<groupId>org.projectlombok</groupId>
			<artifactId>lombok</artifactId>
			<scope>provided</scope>
		</dependency>

		<dependency>
			<groupId>org.springframework.boot</groupId>
			<artifactId>spring-boot-starter-data-jpa</artifactId>
		</dependency>

		<dependency>
			<groupId>org.springframework.boot</groupId>
			<artifactId>spring-boot-starter-test</artifactId>
			<scope>test</scope>
		</dependency>
	</dependencies>

	<build>
		<plugins>
			<plugin>
				<groupId>org.springframework.boot</groupId>
				<artifactId>spring-boot-maven-plugin</artifactId>
			</plugin>
		</plugins>
	</build>

</project>
As you can see there are many dependencies for this example. spring-boot-starter-cache dependency allow to add cache abstraction layer by utilizing different methods for caching. spring-boot-starter-data-redis provides dependencies for working with redis as cache storage. MySQL database acts as main database.
Configure Spring Boot Cache
After adding dependencies in pom, we also need to configure cache and MySQL in application.properties.
Configure MySQL
Add the following configuration in application.properties file for setting up MySQL as main database.
spring.datasource.url= jdbc:mysql://localhost:3306/your_database_name?useSSL=false
spring.datasource.username= your_username
spring.datasource.password= your_password
spring.jpa.properties.hibernate.dialect= org.hibernate.dialect.MySQL5InnoDBDialect
spring.jpa.hibernate.ddl-auto= update
Configure Redis as Cache
Add the following code inside application.properties to setup redis.
spring.redis.host=localhost
spring.redis.password=your passwd
spring.redis.port=6379

spring.cache.type=redis
spring.cache.redis.time-to-live=40000
The host is local as i am running redis locally. You can add your own url and password as required. spring.cache.redis.time-to-live is the cache eviction time duration. How long do you want the cache data to be store is defined by time-to-live value.
spring.cache.type specifies what type of cache storage to use. As you can see redis is used to store cache data.
Define Data Model class for Spring Cache
In model package, let’s define a User class. User as only model class with attributes id, name and age.
User
@Entity
@Table
public class User implements Serializable {

    private static final long serialVersionUID = 7156526077883281623L;

    @Id
    @GeneratedValue(strategy = GenerationType.IDENTITY)
    private Integer id;
    private String name;
    private Integer age;

    public User() {
    }

    public User(String name, Integer age) {
        this.name = name;
        this.age = age;
    }

    public Integer getId() {
        return id;
    }

    public void setId(Integer id) {
        this.id = id;
    }

    public String getName() {
        return name;
    }

    public void setName(String name) {
        this.name = name;
    }

    public Integer getAge() {
        return age;
    }

    public void setAge(Integer age) {
        this.age = age;
    }

    @Override
    public String toString() {
        return String.format("User{id=%d, name='%s', age=%d}", id, name, age);
    }
}
Define Repository Interface Spring JPA
Inside the repository package, let’s create an interface that extends JpaRepository: UserRepository.
It provides some Generic Crud operations like save(), findById(), deleteById(), findAll() and so on. There are many such method which comes out of the box and can use without even implementing.
UserRepository
@Repository
public interface UserRepository extends JpaRepository<User, Integer> {
}
Define Controller for Spring Cache
In this section, we will be creating a controller called UserController. This controller holds 4 endpoints that performs basic CRUD operations on User like creating user, updating user, get user by id and delete user.
UserController
@RestController
@RequestMapping("/users")
public class UserController {

    @Autowired
    UserService userService;

    @PostMapping("/save")
    public ResponseEntity<User> saveUser(@RequestBody User user) {
        User saveUser = userService.saveUser(user);
        return new ResponseEntity<User>(saveUser, HttpStatus.OK);
    }


    @PutMapping("/update/{id}")
    public ResponseEntity<User> updateUser(@RequestBody User user, @PathVariable Integer id) {
        User updateUser = userService.updateUser(id, user);
        return new ResponseEntity<>(user, HttpStatus.OK);
    }


    @DeleteMapping("/{id}")
    public ResponseEntity deleteUser(@PathVariable Integer id) {
        userService.deleteUser(id);
        return new ResponseEntity(HttpStatus.OK);
    }


    @GetMapping("/{id}")
    public ResponseEntity<User> getById(@PathVariable Integer id) {
        User user = userService.findById(id);
        if(user == null) {
          return new ResponseEntity<>(HttpStatus.NOT_FOUND);
        }
        return new ResponseEntity<>(user, HttpStatus.OK);
    }
}
Define Service (holds all the cache operation)
There are different ways to configure cache. Here we will be performing all the cache operations in a service. I feel like service is the right place to layer the caching operations.
UserService
@Slf4j
@Service
public class UserService {

    @Autowired
    private UserRepository userRepository;

    public User saveUser(User user) {
        log.info("saving user");
        return userRepository.save(user);
    }

    @CachePut( value="user", key="#id")
    public User updateUser(Integer id, User user) {
        User userUpd = userRepository.findById(id)
                .orElseThrow();
        userUpd.setAge(user.getAge());
        userUpd.setName(user.getName());

        log.info("Updating user: ", id);
        return userRepository.save(userUpd);
    }

    @CacheEvict( value="user")
    public void deleteUser(Integer id) {
        log.info("Updating user: ", id);
        User user = userRepository.findById(id)
                .orElseThrow();
        userRepository.delete(user);
    }


    @Cacheable( value="user", key="#id")
    public User findById(Integer id) {
        log.info("Getting user from database: " + id);
        Optional<User> optionalUser = userRepository.findById(id);
        if(optionalUser.isEmpty()) {
            return null;
        } else {
            return optionalUser.get();
        }
    }
}
@Slf4j annotation is pulled from lombok dependencies. This dependencies will make logging simple and easy with just a single annotation.
I used logging to keep track of if the data is being pulled from cache or main database (MySQL). @CachePut, @CacheEvict and @Cacheable annotations are placed at the top of method which means if the data exist in the cache then the statements inside methods would not be executed and Log will help to keep track of.
If the service logs value inside of methods, it means a request to database is made and if not then data is pulled from redis cache server.
RedisCacheApplication
@SpringBootApplication
@EnableCaching
public class RedisCacheApplication {

	public static void main(String[] args) {
		SpringApplication.run(RedisCacheApplication.class, args);
	}

}
@EnableCaching annotation is how Spring framework knows that cache should be enabled.
Conclusion
Caching is an important aspect for application development as it enhances user experience and application performance. This post walks us through how Redis or even other database can be used for caching. Along with cache, we learnt how Redis can be configured with main database.