In this post, we will learn how to integrate RabbitMQ in Spring Boot application and mimic real world environment. If you are not comfortable with RabbitMQ and it’s installation process locally, you can have a quick glance rabbitmq-tutorial.
RabbitMQ is a messaging queueing software also know as message broker that allows asynchronous communication between two systems. RabbitMQ stores message and then transfer messages to applications using several protocols that it supports like AMQP, STOMP, MQTT and HTTP. It originally implements the Advance message Queuing Protocol (AMQP).
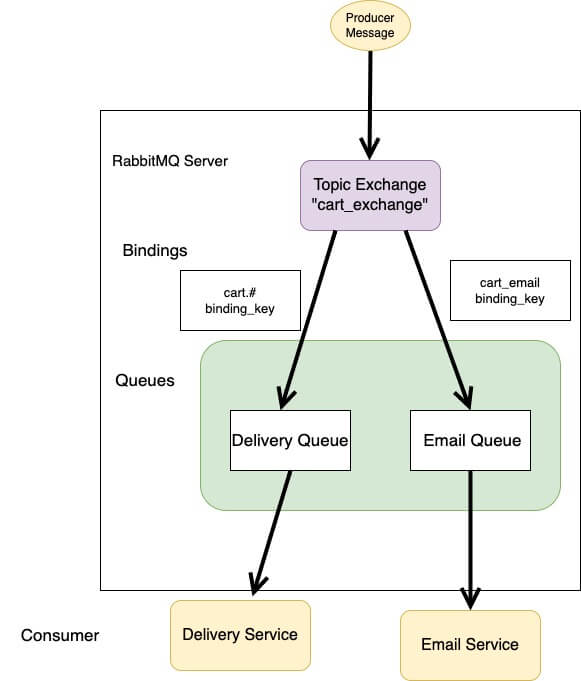
Topic Exchange
The routing key is used once more. However, unlike the direct exchange type, the routing key of the exchange and the bound queues do not have to be an exact match. We can send the exchange to multiple bound queues by using regular expressions like wildcard.
The routing key is a list of words separated by a period. The routing pattern can contain an asterisk (*) to match a pattern like fullstack.*.*.coder.*. A pod symbol (‘#’) can also be used based on need which indicates a match of zero or more words in the pattern.
Publish Message in RabbitMQ
Setup project for RabbitMQ
Let’s use Spring Starter tool to generate a project with one click. I will be using IntelliJ for development. You can use any development tools you like for example Spring Tool Suite or Eclipse.
This is how your pom.xml file should look like:
You might also want to read:


<?xml version="1.0" encoding="UTF-8"?>
<project xmlns="http://maven.apache.org/POM/4.0.0" xmlns:xsi="http://www.w3.org/2001/XMLSchema-instance"
	xsi:schemaLocation="http://maven.apache.org/POM/4.0.0 https://maven.apache.org/xsd/maven-4.0.0.xsd">
	<modelVersion>4.0.0</modelVersion>
	<parent>
		<groupId>org.springframework.boot</groupId>
		<artifactId>spring-boot-starter-parent</artifactId>
		<version>2.6.7</version>
		<relativePath/> <!-- lookup parent from repository -->
	</parent>
	<groupId>com.fullstack.rabbitmq</groupId>
	<artifactId>Topic-Exchange</artifactId>
	<version>0.0.1-SNAPSHOT</version>
	<name>Topic-Exchange</name>
	<description>Demo project for Spring Boot Topic Exchange RabbitMQ</description>
	<properties>
		<java.version>11</java.version>
	</properties>
	<dependencies>
		<dependency>
			<groupId>org.springframework.boot</groupId>
			<artifactId>spring-boot-starter-amqp</artifactId>
		</dependency>
		<dependency>
			<groupId>org.springframework.boot</groupId>
			<artifactId>spring-boot-starter-web</artifactId>
		</dependency>
		<dependency>
			<groupId>org.projectlombok</groupId>
			<artifactId>lombok</artifactId>
			<scope>provided</scope>
		</dependency>
		<dependency>
			<groupId>org.springframework.boot</groupId>
			<artifactId>spring-boot-starter-test</artifactId>
			<scope>test</scope>
		</dependency>
		<dependency>
			<groupId>org.springframework.amqp</groupId>
			<artifactId>spring-rabbit-test</artifactId>
			<scope>test</scope>
		</dependency>
	</dependencies>

	<build>
		<plugins>
			<plugin>
				<groupId>org.springframework.boot</groupId>
				<artifactId>spring-boot-maven-plugin</artifactId>
			</plugin>
		</plugins>
	</build>

</project>
The main dependency that is required for RabbitMQ integration is spring-boot-starter-amqp. I have added lombok dependency as well which is to clean up the model/class code and you will see it later. Lombok dependency is not required and depends upon you.
Configure RabbitMQ in Spring Boot Application
Just adding dependencies is not enough, we also need to update those configuration in application.properties file. Before i hope you have some instances of RabbitMQ up and running and if you do not, then check out this article for RabbitMQ-Installation. Once RabbitMQ is up and running, update application.properties file as necessary.
spring.rabbitmq.host = localhost
spring.rabbitmq.port=5672
spring.rabbitmq.username=guest
spring.rabbitmq.password=guest

spring.main.allow-bean-definition-overriding=true
- spring.rabbitmq.host as the name suggest is the host or the url property for RabbitMQ. Since, i am running rabbitMq locally, it is localhost.
- spring.rabbitmq.port by default runs on 5672.
- spring.rabbitmq.username and spring.rabbitmq.password is same when running locally. However, you can change the username and password too.
- fullstack.exchange is the exchange name for RabbitMQ; similarly fullstack.queue and fullstack.routingkey are the queue and routing key necessary for producer to create message and send it to exchange.
Model object for RabbitMQ
In model package, let’s define Message and User class.
@Getter
@Setter
@ToString
@AllArgsConstructor
@NoArgsConstructor
public class Message {
    String routingKey;
    User user;
}
@AllArgsConstructor
@Getter
@Setter
@ToString
@JsonIdentityInfo(generator = ObjectIdGenerators.IntSequenceGenerator.class, property = "@id", scope = User.class)
public class User implements Serializable {
    private Integer id;
    private String name;
}
Message class holds routingKey attribute and based on that User attribute is routed to the queue. The User class contains two properties id and name. All the getter, setter, toString and all argument constructor is generated by lombok annotation on the top of class. @JsonIdentityInfo annotation is a tool Jackson provides to deal with circular references in custom serialization.
Config for RabbitMQ
@Configuration
public class RabbitMqConfig {

    String deliveryQueue = "delivery_queue_topic";

    String emailQueue = "email_queue_topic";

    String cartExchange = "cart_exchange";

    String deliveryRoutingKey = "delivery.*";

    String emailRoutingKey = "email";

    @Bean
    Queue deliveryQueue() {
       return new Queue(deliveryQueue, false);
    }

    @Bean
    Queue emailQueue() {
        return new Queue(emailQueue, false);
    }

    @Bean
    TopicExchange exchange() {
        return new TopicExchange(cartExchange);
    }

    @Bean
    Binding deliveryBinding(Queue deliveryQueue, TopicExchange exchange) {
        return BindingBuilder.bind(deliveryQueue).to(exchange).with(deliveryRoutingKey);
    }

    @Bean
    Binding emailBinding(Queue emailQueue, TopicExchange exchange) {
        return BindingBuilder.bind(emailQueue).to(exchange).with(emailRoutingKey);
    }

    @Bean
    public MessageConverter messageConverter() {
        return new Jackson2JsonMessageConverter();
    }

    @Bean
    public AmqpTemplate rabbitTemplate(ConnectionFactory connectionFactory) {
        final RabbitTemplate rabbitTemplate = new RabbitTemplate(connectionFactory);
        rabbitTemplate.setMessageConverter(messageConverter());
        return rabbitTemplate;
    }


// @Bean
//    ConnectionFactory connectionFactory() {
//        CachingConnectionFactory cachingConnectionFactory = new CachingConnectionFactory("localhost");
//        cachingConnectionFactory.setUsername();
//        cachingConnectionFactory.setPassword();
//        return cachingConnectionFactory;
//    }
}
RabbitMQ does not work just by setting up. There are few terminologies that comes with RabbitMQ like Queue, Exchange and routing key. These properties need to be configured and all these values is set in application.properties.
Queue bean is created and the durability is set to false. Setting the queue to non-durable will remove queue and message whenever RabbitMQ is stopped. However, it does not affect while restarting RabbitMQ.
Exchange type is Topic Exchange. Messages can be set to multiple queues based on the routing key.
Binding bean is a “link” or address to bind queue with exchange. This is the heart of RabbitMQ to route messages to different queue.
Here, we have used default connection factory. Connection Factory can also be instantiated to facilitate connection to RabbitMQ broker.
MessageConverter is to convert JSON object to message. This is required as RabbitMQ does not understand JSON object, it has to be converted to Message.
Producer Controller
@RestController
@RequestMapping("/api")
public class ProducerController {

    @Autowired
    private AmqpTemplate amqpTemplate;

    public String exchange = "cart_exchange";

    @PostMapping("/message/send")
    public String publishUser(@RequestBody Message message) {
        amqpTemplate.convertAndSend(exchange, message.getRoutingKey(), message.getUser());
        return "Message sent successfully";
    }
}
Producer controller is pretty straight forward. It is the same generic REST API with @PostMapping annotation. We have a model object ready which is sent to RabbitMQ. Now, let’s send the message to RabbitMQ.
RabbitMQ does not send message directly to queue instead a mediator is used in the form of exchange. Exchange property is responsible for routing messages to queues based on different attributes like header, bindings, and routing keys. The send method in the class uses amqpTemplate convertAndSend() method to send message to the queues based on routing key and exchange.
Project Structure

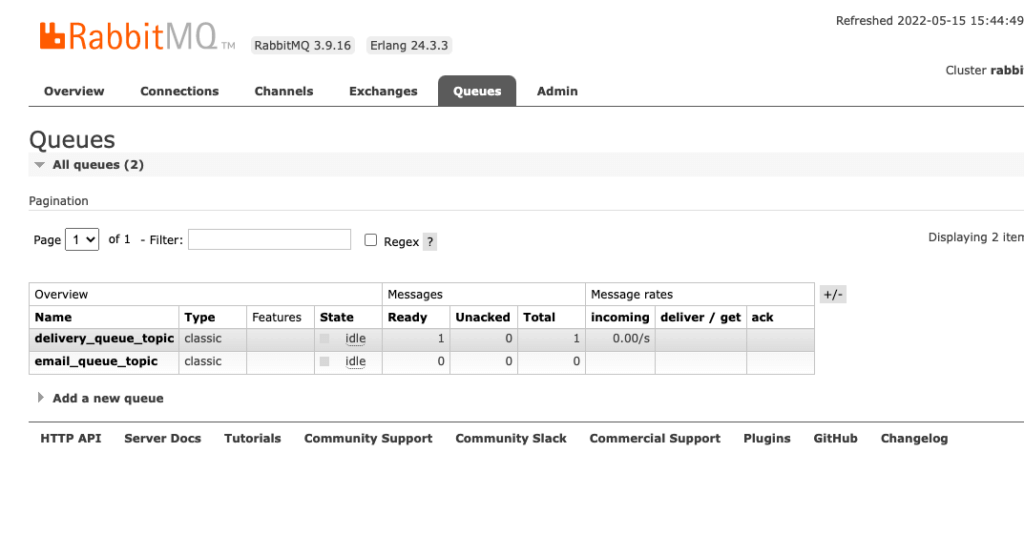
Testing using postman
By default, the project runs on 8080 port. Now, let’s test it with postman. We got one endpoint which sends message to RabbitMQ server.

Consume Message in RabbitMQ
In this part we will consume message that is being published from Producer. Let’s get started:
Setup project for RabbitMQ Consumer
This is how your pom.xml file should look like:
<?xml version="1.0" encoding="UTF-8"?>
<project xmlns="http://maven.apache.org/POM/4.0.0" xmlns:xsi="http://www.w3.org/2001/XMLSchema-instance"
	xsi:schemaLocation="http://maven.apache.org/POM/4.0.0 https://maven.apache.org/xsd/maven-4.0.0.xsd">
	<modelVersion>4.0.0</modelVersion>
	<parent>
		<groupId>org.springframework.boot</groupId>
		<artifactId>spring-boot-starter-parent</artifactId>
		<version>2.6.7</version>
		<relativePath/> <!-- lookup parent from repository -->
	</parent>
	<groupId>com.fullstack.coder</groupId>
	<artifactId>rabbitmq.consumer</artifactId>
	<version>0.0.1-SNAPSHOT</version>
	<name>rabbitmq.consumer</name>
	<description>Demo project for Spring Boot</description>
	<properties>
		<java.version>11</java.version>
	</properties>
	<dependencies>
		<dependency>
			<groupId>org.springframework.boot</groupId>
			<artifactId>spring-boot-starter-amqp</artifactId>
		</dependency>
		<dependency>
			<groupId>org.projectlombok</groupId>
			<artifactId>lombok</artifactId>
			<scope>provided</scope>
		</dependency>
		<dependency>
			<groupId>org.springframework.boot</groupId>
			<artifactId>spring-boot-starter-test</artifactId>
			<scope>test</scope>
		</dependency>
	</dependencies>

	<build>
		<plugins>
			<plugin>
				<groupId>org.springframework.boot</groupId>
				<artifactId>spring-boot-maven-plugin</artifactId>
			</plugin>
		</plugins>
	</build>
</project>
As discussed spring-boot-starter-amqp depedency is required to consume message.
Configure RabbitMQ in Spring Boot Application
I hope RabbitMQ is up and running and if not then checkout RabbitMQ-Installation. Now update application.properties file as necessary.
spring.rabbitmq.host = localhost
spring.rabbitmq.port=5672
spring.rabbitmq.username=guest
spring.rabbitmq.password=guest

server.port=8090
I am running it on different port than producer so that we can test consumer application.
Model object for RabbitMQ
Now let’s define a User class in model package. This user class is required and the message send from producer is of User type.
@AllArgsConstructor
@NoArgsConstructor
@Getter
@Setter
@ToString
//@JsonIdentityInfo(generator = ObjectIdGenerators.IntSequenceGenerator.class, property = "@id", scope = User.class)
public class User implements Serializable {

    private Integer id;
    private String name;

}
The class contains two properties id and name. All the getter, setter, toString and all argument constructor is generated by lombok annotation on the top of class. @JsonIdentityInfo annotation is a tool Jackson provides to deal with circular references in custom serialization.
Service class
This is the class where consumer will be listening to message sent from publisher.
@Component
public class RabbitMqService {

    @RabbitListener(queues = "delivery_queue_topic")
    public void consumeMessage(User user) {
        System.out.println("Message returned:" + user);
    }
}
@RabbitListener annotation listens to message being sent to RabbitMQ server from producer and consumes it. We need to define queue and any message delivered to the queue will be relayed to our Rabbit Listener. In this example, the listener is listening to message being delivered to “delivery_queue”.
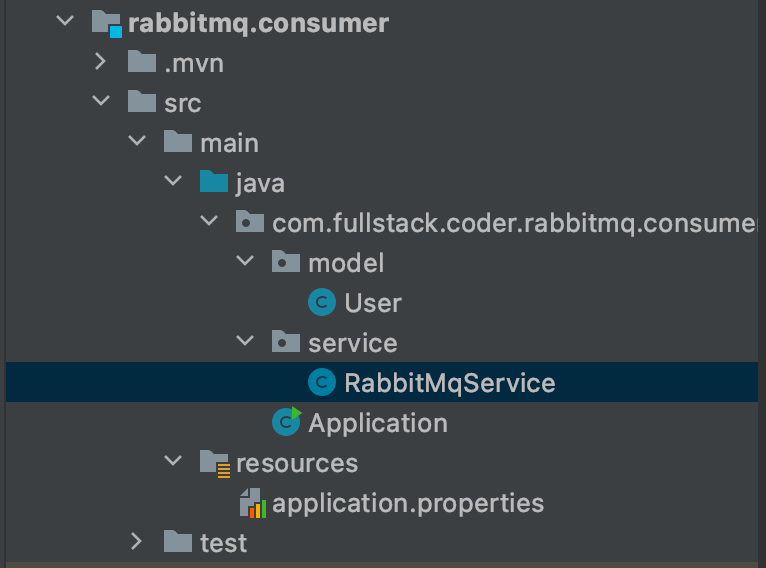
Project Structure

Conclusion
RabbitMQ is a messaging queue software, and we looked at how to build a Producer/Publisher to publish messages to a Topic Exchange RabbitMQ server, as well as a Consumer Application to consume messages sent by the Producer.